Mega menus
A mega menu expands into a large panel when a visitor hovers over a menu item. You can fill it with columns, images, widgets, and product categories instead of a plain list of links.
When to use a mega menu
Section titled “When to use a mega menu”Use a mega menu when a single dropdown list grows too long. They work well for:
- Stores with many product categories
- Menus that need images or descriptions alongside links
- Footers that show recent posts or promotional content
Turn on a mega menu for a menu item
Section titled “Turn on a mega menu for a menu item”- Go to Appearance → Menus.
- Select the menu that contains the item you want to convert.
- Click the arrow on the menu item to expand its settings.
- Check the box labeled Mega Menu.
- Enable the setting Enable mega menu.
- Click Save changes.
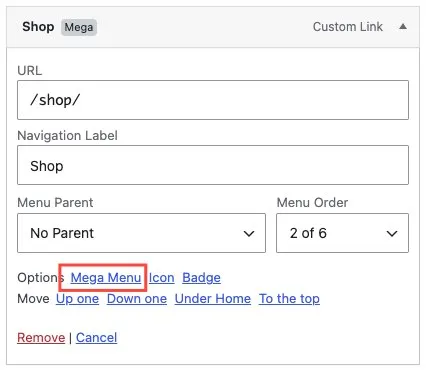
The item now opens a wide panel on hover instead of a narrow dropdown.
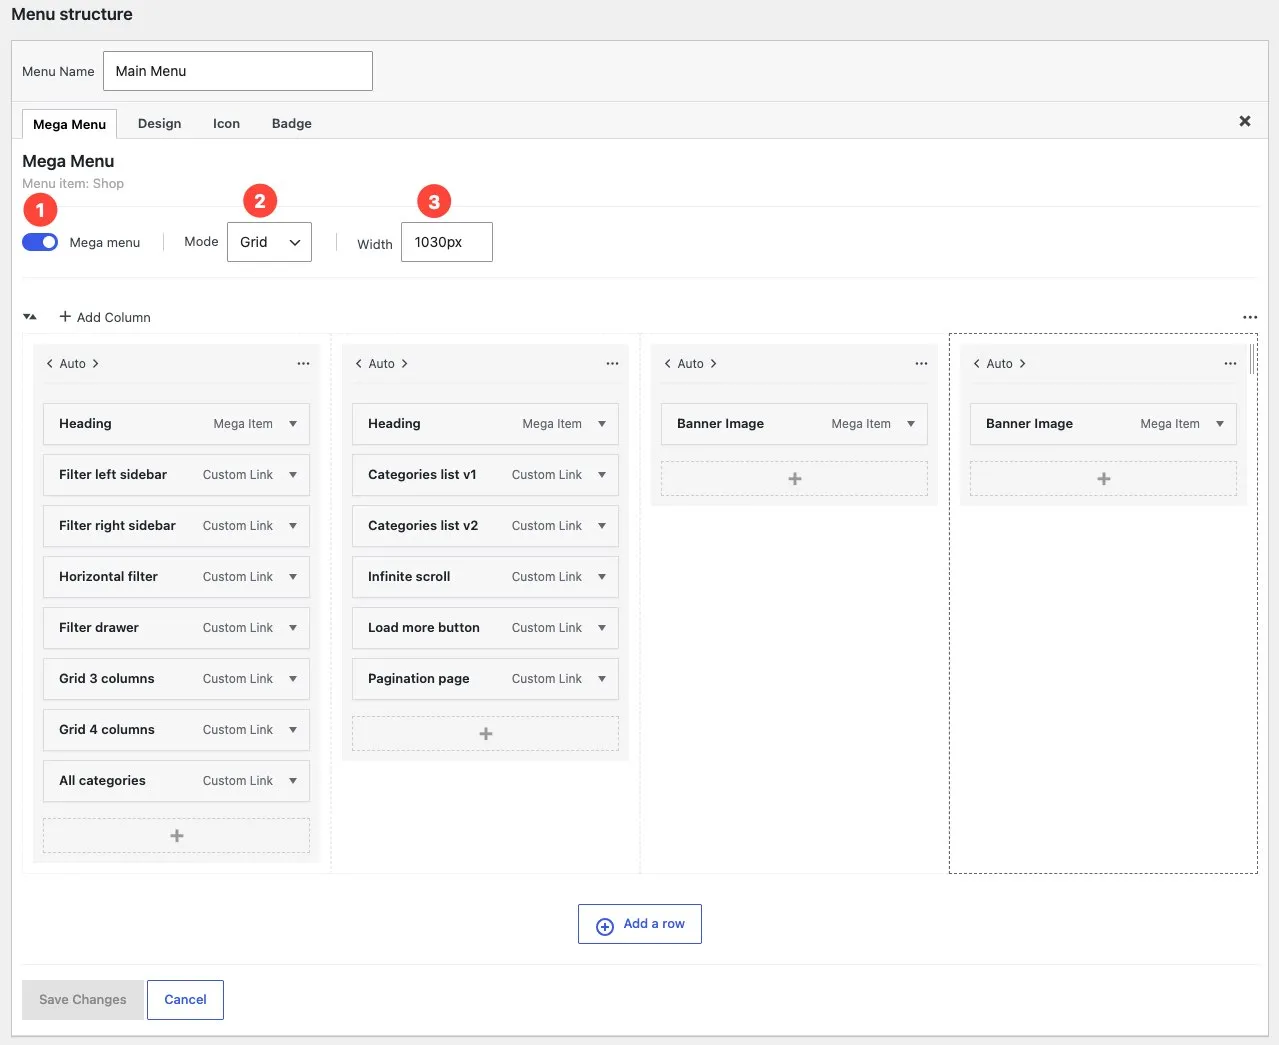
Add rows to your mega menu
Section titled “Add rows to your mega menu”You can organize your mega menu content across multiple rows.
- Open the mega menu item editor.
- Click the Add row button to create a new row.
- Add columns or menu items to each row as needed.
- Click Save menu.
Each row can hold its own set of columns, giving you flexible control over the layout.
Add columns to your mega menu
Section titled “Add columns to your mega menu”You control how content arranges inside the mega panel.
- Open the mega menu item editor.
- Click the Add column button to add a new column.
- Add menu items or widgets to each column as needed.
- Click Save menu.
Child items of the mega menu parent distribute across the columns you create. Add more child items to fill each column.
Add images to a mega menu
Section titled “Add images to a mega menu”You can place images inside a mega menu column using the Banner Image widget.
- In Appearance → Menus, expand the mega menu parent item.
- Select the column where you want the image to appear.
- Add a Banner Image widget item to that column.
- Upload or choose an image from the media library.
- Click Save menu.
The image appears inside the mega menu panel on the front end.
Add widgets to a mega menu
Section titled “Add widgets to a mega menu”You can add menu items and widgets directly into the mega menu columns, just like a standard menu.
- In Appearance → Menus, expand the mega menu parent item.
- You will see its columns listed as child levels.
- Select a column and click Add items to add links, or add a Widget item to place widgets inside that column.
- You can reorder items within each column by dragging them.
- Click Save menu.
Set the mega menu width
Section titled “Set the mega menu width”You can control how wide the mega panel appears.
- Expand the mega menu item settings in Appearance → Menus.
- Find the Mega menu width field.
- Enter a custom width value (for example
1200pxor90vw).
The mega panel will use the width you set. Leave the field empty to use the default width.
- Click Save menu.
Remove a mega menu
Section titled “Remove a mega menu”- Go to Appearance → Menus.
- Expand the mega menu item settings.
- Uncheck the Use as mega menu box.
- Click Save menu.
The item returns to a standard dropdown. Any widgets you added to its widget area remain saved and reactivate if you turn the mega menu back on.
Troubleshooting
Section titled “Troubleshooting”Problem: The mega menu panel looks empty. Fix: Add child menu items to the parent item, or place widgets in the matching widget area under Appearance → Widgets.
Problem: The mega menu does not appear on mobile. Fix: This is expected. Milano shows a standard accordion menu on mobile devices. Mega menus only show on desktop screens.
Problem: I don’t see a widget area for my mega menu item. Fix: Make sure the Use as mega menu checkbox is checked and you have clicked Save menu. The widget area appears after you save.